Tools · Physical Vibe Coding

Plasma Pen Studio

Run the 4-axis machine with your voice: say “mode 1”, “mode 2” or “mode 3” and the pen moves into place. Need another position? Describe it in your own words, the AI adds it to the machine’s code, and one click uploads it. Only distances and the pen angle can change. Everything else stays safely fixed.

1

Connect

Plug the machine into this computer with USB.

2

Set the start point

Place the pen where all distances begin.

3

Say or press a mode

Say “mode 1”, “mode 2”… or press Run. Add modes in plain words.
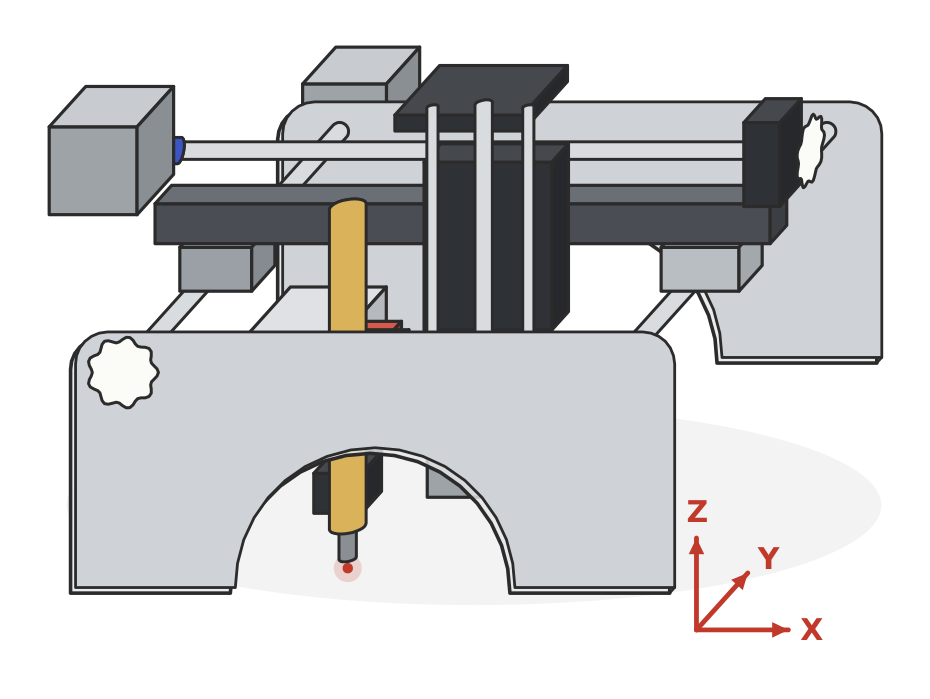
Sketch of the 4-axis Plasma Pen machine: a frame with two arched plates, three lead-screw axes and the pen holderX 12.5 cm · Y 17 cm · Z 5.5 cm · pen 0–45°

1Connect

Connect the machine

Not connected

Plug the machine into this computer with its USB cable and switch on its power supply. Then press Connect and choose the port in the list (it is often called USB-SERIAL CH340).

Checking your access…

For the technical team: board, wiring and software
OrbitCore with a CNC Shield V3 and three DRV8825 drivers set to 1/32 microstepping; NEMA 17 motors on 8 mm lead screws (800 steps per mm). Pins: X step D2 / dir D5, Y step D3 / dir D6, Z step D4 / dir D7, enable D8, servo signal D11. Power the 25 kg·cm servo from its own 5–6 V supply and join its ground to the board. The modes are the MODES table in firmware/plasma4axis/plasma4axis.c (plain AVR C); the page writes the table into the compiled program and flashes it.

2Start point

Set the start point

All distances are measured from the start point. Move the pen to the corner where you want to begin, with the pen lifted, then press This is my start point.

Option A: turn the knobs by hand

Press Free the knobs, then turn the white knobs at the end of each screw to slide the pen into place.

Sketch of the machine seen from above: the Y knob at the front left, the X knob at the right end of the gantry, the Z knob on top of the pen carriage

Option B: use the arrows

Each press

Press and hold an arrow; the pen moves until you let go.

Side to side

X axis

Front to back

Y axis

Depth

Z axis

Pen angle

Go to a position

Leave a box empty to keep that value. By voice: “go to X 5 cm and Y 10 cm”.

Connect the machine (step 1) to use these.

When the pen is in place

The motors will hold the pen here, and every mode is measured from this point.

3Modes

Say or press a mode

Each mode places the pen at a distance from the start point and turns it to an angle. The modes are written in the machine’s own program. Every run follows the same safe order: the machine lifts the pen, moves side to side and front to back, turns the pen, then lowers it to the depth.

Voice control

Founders only.

Change or add a mode in your own words

Now editing: Mode 1 (or name another mode)
1Mode 1Factory values

Side to side (X)

Moves the pen left or right · 0–12.5 cm

cm

Front to back (Y)

Moves the pen towards the back · 0–17 cm

cm

Depth (Z)

Lowers the pen towards the surface · 0–5.5 cm

cm

Pen angle (Angle)

Tilts the pen from straight down (0°) up to 45° · 0–45 °

°

Connect the machine to run.

2Mode 2Factory values

Side to side (X)

Moves the pen left or right · 0–12.5 cm

cm

Front to back (Y)

Moves the pen towards the back · 0–17 cm

cm

Depth (Z)

Lowers the pen towards the surface · 0–5.5 cm

cm

Pen angle (Angle)

Tilts the pen from straight down (0°) up to 45° · 0–45 °

°

Connect the machine to run.

3Mode 3Factory values

Side to side (X)

Moves the pen left or right · 0–12.5 cm

cm

Front to back (Y)

Moves the pen towards the back · 0–17 cm

cm

Depth (Z)

Lowers the pen towards the surface · 0–5.5 cm

cm

Pen angle (Angle)

Tilts the pen from straight down (0°) up to 45° · 0–45 °

°

Connect the machine to run.

See the modes in the machine’s code

This table is part of the machine’s program (plasma4axis.c). Distances are in millimetres here.

/* the modes (x mm, y mm, z mm, pen angle deg) */
const ModeTable MODES PROGMEM = {
{ 'M', 'S', 'P', 'L', 'M', 'O', 'D', 'E' }, 1, 3, { 0, 0 },
{
{ 75.0f, 85.0f, 35.0f, 135.0f }, /* Mode 1: pen 45 deg */
{ 75.0f, 85.0f, 35.0f, 90.0f }, /* Mode 2: pen 0 deg */
{ 75.0f, 85.0f, 35.0f, 120.0f }, /* Mode 3: pen 30 deg */
},
};

Preview of mode 1

X 7.5 cm · Y 8.5 cm · Z 3.5 cm · Angle 45°
051012.505101517X side to side (cm)Y front to back (cm)Start point231
Seen from above. Coloured dots are the modes.
0 cm (start)5.5 cmDepth 3.5 cm
4530150153045
Pen 45°
Before running: keep hands and cables away from the moving parts. Say “stop” or press the red STOP button (bottom right while the machine moves) to stop it at once.

4Motion control

Scan the nozzle over an area

Choose how the nozzle moves and how fast, see the estimated scanning time, then run the movement, by hand or by voice. The scan keeps the pen angle, and the height you choose. This page only moves the nozzle: the plasma is switched on and off by the operator.

Engineering settings · configurable

How the machine moves. Changing them does not make them clinically validated.

Clinically validated treatment parameters

None are set for this machine. Plasma exposure, dose, power and treatment duration must come from an approved clinical protocol for this device. Nothing on this page sets them.

Motion settings

Engineering
mm/s

Machine range 0.5–10 mm/s.

Initial reference: 8 mm/s

8 mm/s is an initial reference taken from a device-specific protocol reported in the literature (citation to be added). It has not been validated for this machine and is not a clinical recommendation. Change it as needed.

Scan pattern

Back and forth along parallel lines to cover a rectangular area.

mm
mm
mm

Where to scan

Connect the machine and set the start point.

Saved motion settings

Scanning time calculator

mm²
mm
mm/s

Raster formula

Enter the wound area in mm².

Planned raster path

31.6 s

0.53 min · 31.6 s

240 mm of path, including slowing down at the turns and moving between lines

This estimates the mechanical scanning time only. It does not determine the medically appropriate plasma exposure or treatment duration, and nothing starts automatically from it.

Preview

Seen from above · mm
0125 mm (X)170Start

Run the scan

Founders only.

5Camera · find and treat dark spots

Find dark spots, then treat each one

The camera rides with the pen (17.5 cm above the pen tip, 15 mm in front of it). It photographs the skin, finds dark spots and maps them. You pick the spots, touch the skin once with the pen, set the speed, the distance and the pen angle, and the machine aims the laser point (where the pen points on the skin) at each spot. The plasma is switched on and off by the operator.

Laser point on skinConnect and set the start point.

ACamera

Camera off

White dashes: the working area. Blue ring: under the pen tip.

Camera and pen set-up

Picture turned 0°: the right of the picture is +X and the top is the far side (+Y). If the white working-area outline does not sit on the machine, change these.

Which way does the pen tip lean? Now: a servo value above 90° leans the tip towards larger X.

Map of the skin

seen from above · mm · tap a spot to pick it
0125 mm X170

BFind the dark spots

Founders only.

CTouch the skin with the pen

  1. Move the pen, lifted and straight down, over a spot:
  2. Lower it slowly until the tip just touches the skin:
    Z now – mm

DOperation settings

Engineering · not clinically validated
mm/s

0.5–10 mm/s · reference 8 mm/s

mm

0.5–30 mm

°

0° straight down to 45°

mm
mm

8 mm/s is an initial reference taken from a device-specific protocol reported in the literature (citation to be added). It has not been validated for this machine and is not a clinical recommendation. Change it as needed. The speed uses the same limits and reference as Motion control (step 4).

Pen side: spots past the middle of X (62.5 mm) use servo 90 + angle, the others 90 − angle; the machine adds its 2° servo correction. The machine moves so the laser point stays on the spot for any angle and distance (pen centre of rotation 17.5 mm above the tip).

ESurface shape Experimental

Takes two photos 40mm apart along X and compares them (like two eyes) to estimate how high the skin is everywhere. Then the pen height and angle can follow the arm's shape. Skin with little texture or poor light gives few points; small ink dots around the area help.

Treat the picked spots

Founders only.